Collecting Readings
Last update - 8/5/2009
Readings are best made in clear sky or lightly cloudy (cirrus type) conditions.
Useful readings can be obtained in irradiance levels down to about 300 watts
per square meter or just before shadows disappear.
If the radiometer has any bands 1100 nm or higher, allow at least
fifteen minutes for the radiometer to adjust to the outside temperature.
Before going to the field to take readings, be sure the MSR.BAS program and
current configuration/calibration is
loaded in the DLC. Check that the Date, Time, Latitude, Longitude, and GMT
Difference are correct for the location where you will be obtaining readings. This is
more easily done using the TERMINAL program on a PC rather than using the
smaller display of the CT100 Hand Terminal. Additional information and detail
is available in the Operation section of the MSR User's Manual.
What follows below are the steps to obtain field plot readings.
TAKING READINGS
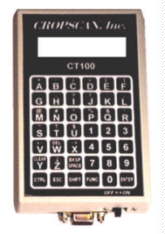
- With the CT100 Hand Terminal connected to the DLC with the CT9M9M-5 cable,
slide the CT100 Power switch to the ON position (Note: The CT100 gets its power
from the DLC). The CT100 will flash some diagnostics characters on its display
for a few seconds. When complete, the underscore character will be
displayed in the upper left-hand corner of the display.
- Press the Enter key 3 times at approximately 1 second intervals. The
following will appear and scroll upwards on the display:
DATA LOGGER CONTROLLER (DLC)
Copyright 1992-2002 by CROPSCAN, Inc.

MULTISPECTRAL RADIOMETER (MSR)
Copyright 1992-2001 by CROPSCAN, Inc.

MSR PROGRAM
 16 WAVELENGTHS
Enter or M-Menu
|
The number of wavelengths shown depends on the radiometer model and how
many channels are configured for RECORDing.
- Press Enter to proceed with the program.
RECORD:
1 EVERY SS.
2 AVERAGE SS.1
|
Choose 1 to record every Sub-Sample per plot or
choose 2 to record the average of the Sub-Samples.
AUTO PLOT #s
BEGIN PLOT#:1
END PLOT#:80
|
If automatic sequential plot numbering is configured. Any plot number
may be chosen for the beginning plot number but the ending plot number
cannot exceed 99999999. If manual plot numbering is configured, any
plot number up to 99999999 may be entered. Spaces are ignored.
After entering the beginning and ending plot numbers, the following
information is displayed.
PRESS SPACE OR
MANUAL SWITCH
TO SCAN
R-Repeat scan
P-repeat Plot
S-Suspend
M-Menu
W-WhiteStandard
D-Dark Reading
|
The present plot (P) and plot sub-sample (S) numbers are then displayed on the first line.
On the second line the real-time solar irradiance, IRR, and DLC battery voltage (B) are displayed.
Note: If only down-facing sensors are being used then white reference panel
readings will be necessary. Readings should only be
taken on very clearsky days. It will be necessary
to take at least one Dark Reading before taking any plot readings. To do this,
press the D key. At the prompt, hold the dark (black) card against the bottom
of the radiometer to block all light from the down-facing sensors. Press the
Enter key after several seconds. Next, it will be necessary to take frequent
white panel reference readings, perhaps once before every plot reading, depending
on time of day (sunangle rate of change is least at solar noon and moreso
earlier and later at larger sunangles).
To do this, press the W key. Hold the radiometer level over a leveled white
reference panel and press Enter, as prompted on the CT100 hand terminal
display.
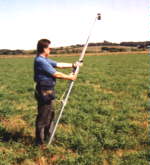
- Facing the sun, so as not to cast a shadow on the radiometer plot
view area, position the pole to the desired spot over the first plot, tilting
the pole so the bubble is centered and hence the radiometer leveled.
- Initiate a scan by pushing the space key or space bar or by pressing
the hand-held manual scan push-button switch (optional accessory) momentarily.
PLOT   1 SAMP  1
Scanning...
|
The message ‘scanning...’ will appear on the screen. Simultaneously, an
audible beep will be heard. When the scan is complete (about two seconds)
two asterisks ‘**’ will be displayed and simultaneously, two beeps will
be heard.
PLOT   1 SAMP  1
Scanning...**
|
At this time, you can move to the next plot during which time
the data is recorded and the word ‘Done’ appears. Simultaneously, three
beeps will be heard.
After the scan is done, the next plot number or sample will be displayed
to indicate that the system is ready for the next scan.
PLOT   2 SAMP  1
IRR  809 B 10.7
|
Continue with step 4 above.
To suspend operations after the plot number has been displayed (auto mode),
or manually entered (manual mode), press the S key. The DLC will go to
sleep and resume operations exactly where you left off upon a restart by
pressing the Enter key three times. If you use the CT100 hand terminal,
switch the power to OFF to reduce power drain until you are ready to
resume operations.
- After the last plot scan has completed, press the 'M' key to return
to the MSR Main Menu:
         MSR MAIN MENU
 1 Config-Status
 2 ReConfigure     7 Memory Card
 3 Retrieve Data   8 MSR Program
 4 Clear Data      9 Exit MENU
 5 View           10 BYE
Enter Selection/Command
*10
|
- Type 10 and press Enter to put the DLC to sleep:
Returning to SLEEP... BYE!
|
At this point, the plot readings have been made and the sensor millivolt
readings logged in the DLC. The next step would be to
RETRIEVE the data from the DLC to a PC file.
 CROPSCAN, Inc. Home Page
CROPSCAN, Inc.
1932 Viola Heights Lane NE
Rochester, MN 55906 USA
Phone: (507)285-9230
Email: Cropscan@compuserve.com
URL: http://www.cropscan.com
©2017 CROPSCAN, Inc.
all rights reserved